Using the Add/Discover Devices wizard
Depending on which entry mode you want to use, perform one of the following procedures to add devices. (If you need help deciding, see
Choosing an entry mode for adding devices.) You can run the Add/Discover Devices wizard several times, using different entry modes.
Any SNMP v1/v2c community strings, SNMP v3 credentials, or CLI credentials added through the Add/Discover Devices wizard are stored in the
Global credentials lists.
To add devices from a device info file
1. Log in to the UI as a user with administrative privilege.
2. Choose Configure > Add/Discover Devices.
The Add/Discover Devices wizard appears, as shown in the following screen.
Add/Discover Devices pop-up
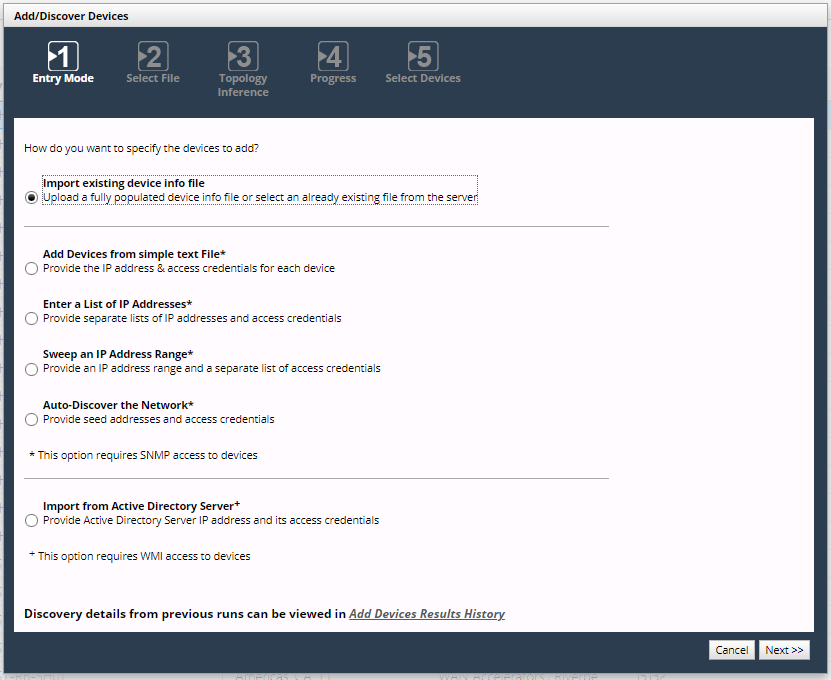
Wizard Step 1 - Entry Mode:
3. Select Import existing device info file and click Next.
When you add devices from a device info file, the SNMP discovery process does not run to contact the devices.
Wizard Step 2 - Select File:
4. Select the appropriate method:
– Import File on Server:
Use this method if a previously exported device info file is already on the server.
Click Select File to select a file on the server.
– Upload File to Server:
Use this method if the device info file that you want to import is on your local machine.
Click Upload File select a device info file to upload.
SNMP v1/v2c community strings, SNMP v3 credentials, and CLI credentials from this file are stored in
Global credentials lists.
5. Click Next.
Wizard Step 4 - Topology Inference:
6. Choose whether you want to perform link and connection inference when adding devices.
In larger networks, link and connection inference may take a significant amount of time to recalculate connectivity. Consider this option, if you are adding only a few devices and can wait until your regularly scheduled topology refresh cycle (“Master Schedule”) runs. An object’s Browse tab includes its Object ID (ID) and Display Name (displayName) value for reference.
7. Click Next.
Wizard Step 3 - Summary:
8. Review the summary.
The collection settings will be read from the provided device info file.
Wizard Step 3 - Progress:
The discovery process begins.
Optionally, click Continue in Background to close the Add/Discover Devices wizard (without stopping the discovery process) and perform other tasks in NetIM. The next time you run the Add/Discover Devices wizard, it will return to this step and allow you to continue.
When the process is complete, click Next.
Wizard Step 4 - Select Devices:
9. Select the devices to monitor.
10. Click Finish.
To add devices from a simple text file
1. Log in to the UI as a user with administrative privilege.
2. Choose Configure > Add/Discover Devices.
The Add/Discover Devices wizard appears, as shown in the following screen.
Add/Discover Devices - Add Devices from simple text file

Wizard Step 1 - Entry Mode:
3. Select Add Devices from simple text file and click Next.
When you add devices from a simple text file, the devices you specify will be contacted using SNMP.
Wizard Step 2 - Select File:
4. Click Upload File to choose and upload a file containing information about the devices to be discovered.
5. After the file is uploaded, identify which columns contain the necessary information about each device (IP address/hostname and so on). Right-click in a column heading to identify the information contained in that column. SNMP v1/v2c community strings, SNMP v3 credentials, and CLI credentials from this file are stored in
Global credentials lists.
You must provide the correct SNMP v1/v2c community strings and SNMP v3 credentials for your network. Only devices that are successfully contacted using SNMP will be added to NetIM. If you have configured NetIM for workflows that require CLI access, you should also provide access credentials in order for the device entries to be correctly configured for collection.
6. After the required columns have been identified (as indicated in the right pane), click Next.
Wizard Step 4 - Topology Inference:
7. Choose whether you want to perform link and connection inference when adding devices.
In larger networks, link and connection inference may take a significant amount of time to recalculate connectivity. Consider this option, if you are adding only a few devices and can wait until your regularly scheduled topology refresh cycle (“Master Schedule”) runs. An object’s Browse tab includes its Object ID (ID) and Display Name (displayName) value for reference.
8. Click Next.
Wizard Step 3 - Summary:
9. Review the summary.
The collection settings will be set for newly discovered devices.
10. Click Next.
Wizard Step 4 - Progress:
11. Click Continue in Background to close the Add/Discover Devices wizard (without stopping the discovery process) and do other tasks in the NetIM UI.
The next time you run the Add/Discover Devices wizard, it will return to the Progress page and allow you to continue.
When discovery and configuration of device entries is complete, the Continue in Background button disappears.
Wizard Step 5 - Select Devices:
12. Select the devices to monitor.
13. Click Finish.
To add devices from a list of IP addresses
1. Log in to the UI as a user with administrative privilege.
2. Choose Configure > Add/Discover Devices.
The Add/Discover Devices wizard appears, as shown in the following screen.
Add/Discover Devices - Enter a list of IP addresses
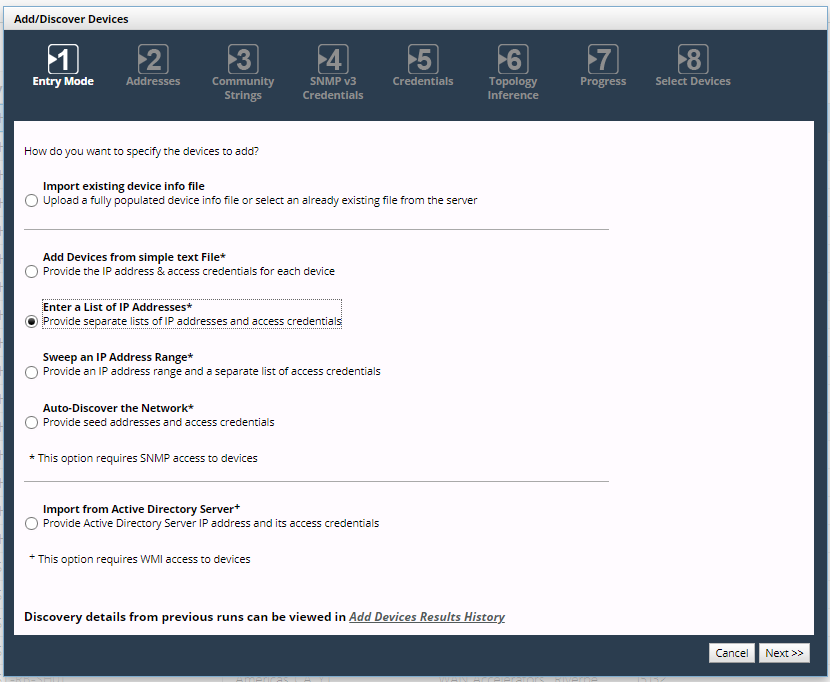
Wizard Step 1 - Entry Mode:
3. Select Enter a List of IP Addresses and click Next.
When you add devices from a list of IP addresses, only the IP addresses/hostnames you specify will be contacted by SNMP.
Wizard Step 2 - Addresses:
4. Enter IP addresses or hostnames for the devices you want to add. You can add devices individually or by uploading one or more files. If uploading a file, specify one entry per line.
5. Click Next.
Wizard Step 3 - Community Strings:
6. Enter the SNMP v1/v2c community strings that NetIM should use when trying to contact devices. You can add community strings individually or by uploading one or more files. If uploading a file, specify one entry per line. Entries you add are stored in
Global credentials lists.
The community strings list might be preloaded with some strings. You can remove community strings only for the current run of the Add/Discover Devices wizard.
You must provide correct SNMP v1/v2c community strings or SNMP v3 credentials for your network. Only devices that are successfully accessed by SNMP will be added to NetIM.
7. Click Next.
Wizard Step 4 - SNMP v3 Credentials:
8. Enter the SNMP v3 credentials that NetIM should use when trying to contact devices. You can add credentials individually or by uploading one or more files. If uploading a file, specify one entry per line. Entries you add are stored in
Global credentials lists. The SNMP v3 credentials list might be preloaded with some credentials. You can remove credentials only for the current run of the Add/Discover Devices wizard. You must provide correct SNMP v1/v2c community strings or SNMP v3 credentials for your network. Only devices that are successfully accessed by SNMP will be added to NetIM.
9. Click Next.
Wizard Step 5 - Credentials:
10. Enter the credentials that NetIM should use when trying to log in to devices. Credentials comprise a username, password, and optional privileged password, separated by forward slashes (/) or commas. You can add credentials individually or by uploading one or more files. If uploading a file, specify one entry per line. Entries you add are stored in
Global credentials lists. The credentials list might be preloaded with some credentials. You can remove credentials only for the current run of the Add/Discover Devices wizard. If you want to permanently remove them from
Global credentials lists, see
Device Autodiscovery. If you have configured NetIM for workflows that require CLI access, you should also provide access credentials in order for the device entries to be correctly configured for collection.
11. Click Next.
Wizard Step 4 - Topology Inference:
12. Choose whether you want to perform link and connection inference when adding devices. In larger networks, link and connection inference may take a significant amount of time to recalculate connectivity. Consider this option, if you are adding only a few devices and can wait until your regularly scheduled topology refresh cycle (“Master Schedule”) runs. An object’s Browse tab includes its Object ID (ID) and Display Name (displayName) value for reference.
13. Click Next.
Wizard Step 6 - Summary:
14. Review the summary. If you need to make changes, click Previous.
15. Click Next.
Wizard Step 7 - Progress:
16. Click Continue in Background to close the Add/Discover Devices wizard (without stopping the discovery process) and do other tasks in the NetIM UI. The next time you run the Add/Discover Devices wizard, it will return to the Progress page and allow you to continue.
When discovery and configuration of device entries is complete, the Continue in Background button disappears.
Wizard Step 7 - Select Devices:
17. Select the devices to monitor.
18. Click Finish.
To add devices by sweeping an IP address range
1. Log in to the UI as a user with administrative privilege.
2. Choose Configure > Add/Discover Devices.
The Add/Discover Devices wizard appears, as shown in the following screen.
Add/Discover Devices - Sweep an IP address range
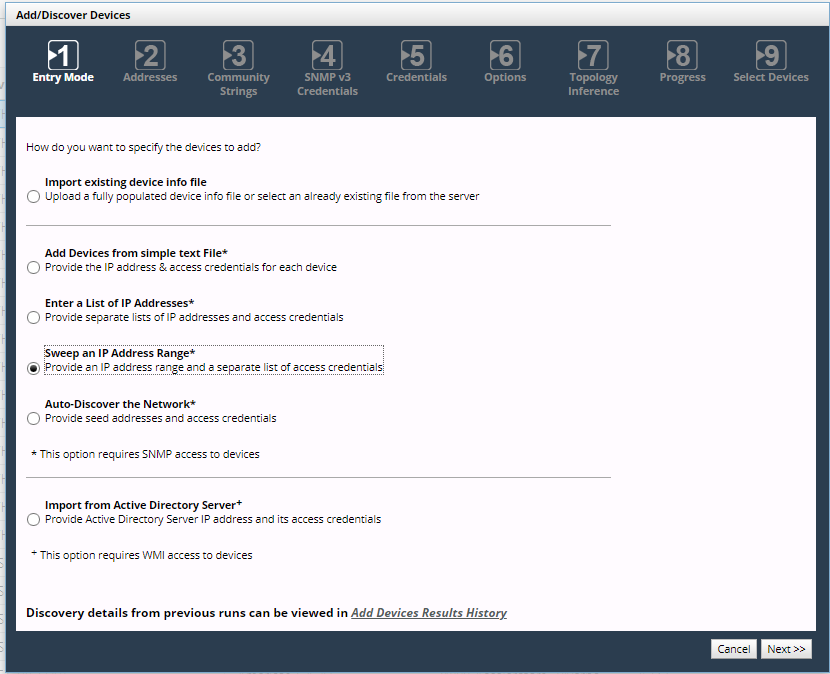
Wizard Step 1 - Entry Mode:
3. Select Sweep an IP Address Range and click Next.
When you add devices using this entry mode, only the specified devices and devices in the specified range(s) will be contacted by SNMP.
Wizard Step 2 - Addresses:
4. Enter specific devices and/or device ranges for the discovery process. Addresses that are not within the specified ranges are not considered for the discovery process. You can add devices and ranges to either list individually or by uploading one or more files. If uploading a file, specify one entry per line.
5. Click Next.
Wizard Step 3 - Community Strings:
6. Enter the SNMP v1/v2c community strings that NetIM should use when trying to contact devices. You can add community strings individually or by uploading one or more files. If uploading a file, specify one entry per line. Entries you add are stored in
Global credentials lists.
The community strings list might be preloaded with some strings. You can remove community strings only for the current run of the Add/Discover Devices wizard. You must provide the correct SNMP v1/v2c community strings for your network. Only devices that are successfully accessed by SNMP will be added to NetIM.
7. Click Next.
Wizard Step 4 - SNMP v3 Credentials:
8. Enter the SNMP v3 credentials that NetIM should use when trying to contact devices. You can add credentials individually or by uploading one or more files. If uploading a file, specify one entry per line. Entries you add are stored in
Global credentials lists. The SNMP v3 credentials list might be preloaded with some credentials. You can remove credentials only for the current run of the Add/Discover Devices wizard. If you want to permanently remove them from
Global credentials lists, see
Managing Global Credentials and Other Global Discovery Settings. You must provide the correct SNMP v3 credentials for your network. Only devices that are successfully accessed by SNMP will be added to NetIM.
9. Click Next.
Wizard Step 5 - Credentials:
10. Enter the credentials that NetIM should use when trying to log in to devices. Credentials comprise a username, password, and optional privileged password, separated by forward slashes (/) or commas. You can add credentials individually or by uploading one or more files. If uploading a file, specify one entry per line. Entries you add are stored in
Global credentials lists. The credentials list might be preloaded with some strings. You can remove credentials only for the current run of the Add/Discover Devices wizard. If you have configured NetIM for workflows that require CLI access, you should also provide access credentials in order for the device entries to be correctly configured for collection.
11. Click Next.
Wizard Step 6 - Summary:
12. Review the summary. If you need to make changes, click Previous.
Wizard Step 7 - Options:
Customize the discovery process by specifying the maximum time, device types to include, and vendors to exclude. When finished, click Next.
13. Click Next.
Wizard Step 8 - Topology Inference:
14. Choose whether you want to perform link and connection inference when adding devices. In larger networks, link and connection inference may take a significant amount of time to recalculate connectivity. Consider this option, if you are adding only a few devices and can wait until your regularly scheduled topology refresh cycle (“Master Schedule”) runs. An object’s Browse tab includes its Object ID (ID) and Display Name (displayName) value for reference.
15. Click Next.
Wizard Step 9 - Progress:
16. Click Continue in Background to close the Add/Discover Devices wizard (without stopping the discovery process) and do other tasks in the NetIM UI. The next time you run the Add/Discover Devices wizard, it will return to the Progress page and allow you to continue.
When discovery and configuration of device entries is complete, the Continue in Background button disappears.
17. Click Finish.
To add devices by autodiscovering the network
1. Log in to the UI as a user with administrative privilege.
2. Choose Configure > Add/Discover Devices.
The Add/Discover Devices wizard appears, as shown in the following screen.
Add/Discover Devices - Auto-discover the network
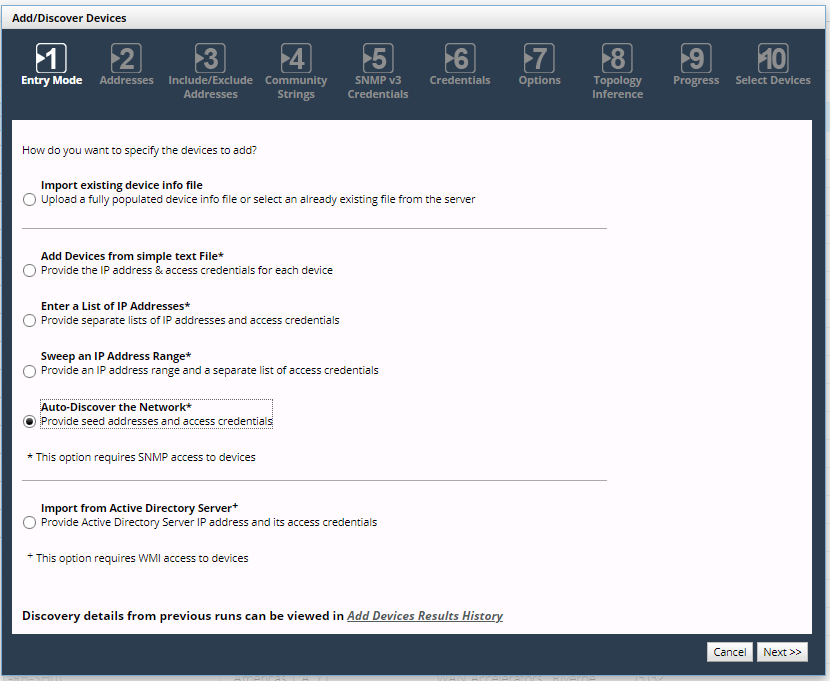
Wizard Step 1 - Entry Mode:
1. Select Auto-Discover the Network and click Next.
When you add devices by autodiscovering the network, the specified seed devices and other devices will be contacted by SNMP. NetIM learns new addresses from the seed, and then the discovery process contacts those devices to learn addresses, and so on.
Wizard Step 2 - Addresses:
2. Enter seed devices and/or device ranges for the discovery process. You can add discovery seeds individually or by uploading one or more files. If uploading a file, specify one entry per line.
3. Click Next.
Wizard Step 3 - Include/Exclude Addresses page:
4. Optionally, enter specific devices and device ranges to be included or excluded from discovery. You can add devices and ranges to either list individually or by uploading one or more files. If uploading a file, include one entry per line.
We recommend that you limit autodiscovery to the SNMP-enabled devices in the network domain of interest over which you have access and management control and from which you want to collect data using NetIM’s direct collection adapters.
The include and exclude addresses lists might be preloaded with some values that were added using autodiscovery.
5. When finished, click Next.
Wizard Step 4 - Community Strings page:
6. Enter the SNMP v1/v2c community strings that NetIM should use when trying to contact devices. You can add community strings individually or by uploading one or more files. If uploading a file, include one entry per line. Entries you add are stored in
Global credentials lists.
The community strings list might be preloaded with some strings. You can remove community strings only for the current run of the Add/Discover Devices wizard. You must provide the correct SNMP v1/v2c community strings for your network. Only devices that are successfully accessed by SNMP will be added to NetIM.
7. When you have entered all necessary SNMP v1/v2c community strings, click Next.
Wizard Step 5 - SNMP v3 Credentials page:
8. Enter the SNMP v3 credentials that NetIM should use when trying to contact devices. You can add credentials individually or by uploading one or more files. If uploading a file, include one entry per line. Entries you add are stored in
Global credentials lists.
The SNMP v3 credentials list might be preloaded with some credentials. You can remove credentials only for the current run of the Add/Discover Devices wizard.
You must provide the correct SNMP v3 credentials for your network. Only devices that are successfully accessed by SNMP will be added to NetIM.
9. When you have entered all necessary SNMP v3 credentials, click Next.
Wizard Step 6 - Credentials page:
10. Enter the credentials that NetIM should use when trying to log in to devices. Credentials comprise a username, password, and optional privileged password, separated by forward slashes (/) or commas. You can add credentials individually or by uploading one or more files. If uploading a file, include one entry per line. Entries you add are stored in
Global credentials lists.
The credentials list might be preloaded with some strings. You can remove credentials only for the current run of the Add/Discover Devices wizard. If you have configured NetIM for workflows that require CLI access, you should also provide access credentials in order for the device entries to be correctly configured for collection.
11. When you have entered all necessary credentials, click Next.
Wizard Step 7 - Options page:
12. Customize the discovery process by specifying the maximum time, device types to include, and vendors to exclude. When finished, click Next.
Wizard Step 8 - Topology Inference
Choose whether you want to perform link and connection inference when adding devices.
In larger networks, link and connection inference may take a significant amount of time to recalculate connectivity. Consider this option, if you are adding only a few devices and can wait until your regularly scheduled topology refresh cycle (“Master Schedule”) runs. An object’s Browse tab includes its Object ID (ID) and Display Name (displayName) value for reference.
Wizard Step 9 - Summary page:
13. Review the summary. If you need to make changes, click Previous.
14. When you are finished click Next.
Wizard Step 10 - Progress page:
15. Click Continue in Background to close the Add/Discover Devices wizard (without stopping the discovery process) and do other tasks in the NetIM UI. The next time you run the Add/Discover Devices wizard, it will return to the Progress page and allow you to continue.
When discovery and configuration of device entries is complete, the Continue in Background button disappears.
Wizard Step 11 - Select Devices:
16. Select the devices to monitor.
17. Click Finish.