Adding devices by importing from the Active Directory server
To import devices from the Active Directory server
1. Log in to the UI as a user with administrative privilege.
2. Choose Configure > Add/Discover Devices.
The Add/Discover Devices wizard appears, as shown in the following screen.
Add/Discover Devices - Import from active directory server
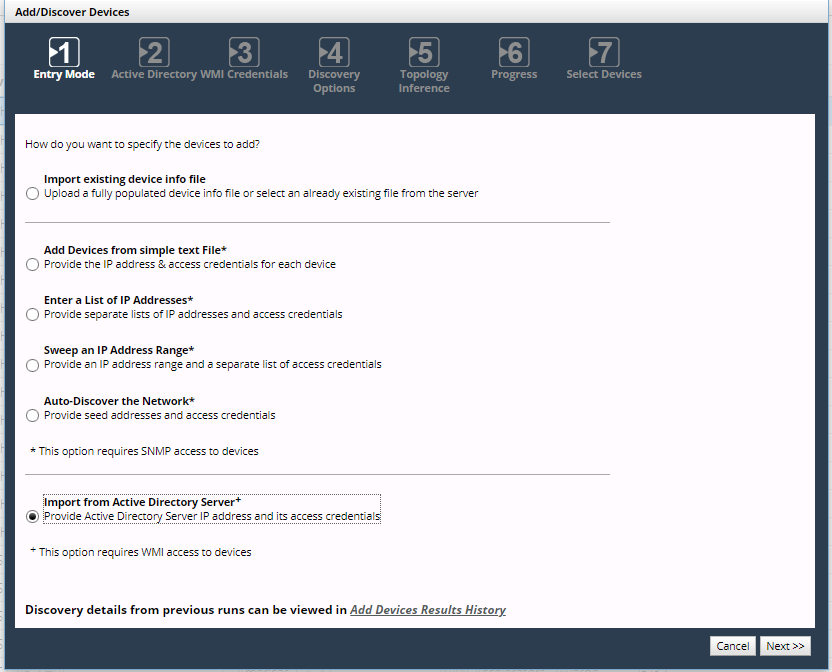
Wizard Step 1 - Entry Mode:
3. Select Import from Active Directory Server and click Next.
When you add devices by importing from an Active Directory Server, NetIM contacts the devices using WMI. This action is possible only if the devices have been WMI-enabled to make them accessible.
Wizard Step 2 - Active Directory:
4. Under Active Directory Server Settings, enter the IP address or full hostname of the server containing the WMI-accessible device list. Under WMI Credentials for Active Directory Server, enter the account username, password, and domain that NetIM later uses to log in to the Active Directory server.
5. Click Next.
The user account must have adequate credentials to retrieve the list of WMI-capable devices.
Wizard Step 3 - WMI Credentials:
6. Enter the username, password, and domain (in that order) required to access one or more individual WMI-enabled devices. Click the plus sign icon to enter those credentials in the list.
7. You can, in addition, upload a text file containing credentials in the same format you see in the list box, one set of slash-separated credentials per line. Click Load From File to upload the file and those credentials then show in the list alongside any credentials you added manually.
8. To show only asterisks for the passwords in the credentials list, select Hide WMI Credentials.
9. To remove all credentials from the list, click Clear All; to remove only a single line of credentials in the list, highlight it and click Remove Selected. At least one set of credentials is required to proceed in the wizard.
10. Click Next.
Wizard Step 4 - Discovery Options:
11. To restrict the devices discovered to those with DNS resolvable names, select Only consider DNS resolvable names.
12. To restrict the devices discovered to those that have Server in their operating system name, for the System Type select Servers Only from the drop-down menu; otherwise, you can select All.
If the credentials list is preloaded with strings you do not want, you can remove those credentials only for the current walk-through of the Add/Discover Devices wizard.
13. Check to be sure you are satisfied with your settings up to this point in the wizard, because once you click Next on this page, you launch the discovery process and are not able to return to the previous pages and make changes. The next time you return to the wizard and select Import from Active Directory Server, it does not remember any of the settings you entered last time.
14. When you have entered all necessary credentials, click Next to launch the discovery process and proceed to the next page.
Wizard Step 5 - Topology Inference:
15. Choose whether you want to perform link and connection inference when adding devices.
In larger networks, link and connection inference may take a significant amount of time to recalculate connectivity. Consider this option, if you are adding only a few devices and can wait until your regularly scheduled topology refresh cycle (“Master Schedule”) runs. An object’s Browse tab includes its Object ID (ID) and Display Name (displayName) value for reference.
Wizard Step 6 - Progress:
16. If you would like, you can wait while the Progress page updates. Alternatively, you can click Continue in Background to run the discovery process in the background, close the Add/Discover Devices wizard, and carry out other tasks in the NetIM UI. The next time you run the Add/Discover Devices wizard, it returns to the Progress page and you can continue. When discovery of devices is complete, the Continue in Background button disappears.
Wizard Step 7 - Select Devices:
17. This page displays how many devices were discovered and how many were rediscovered and then lists them all in a table. You use this page to select devices you want polled. To select all or none of them, click All or None. Otherwise, select the check box under Active for the device you want to poll.
18. To return to the Progress page, click Previous. To leave the wizard, click Finish.
NetIM schedules the devices you choose to have polled.
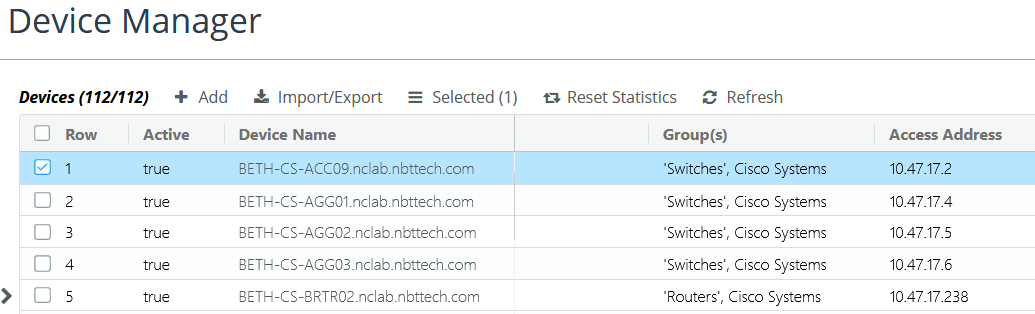
After you have imported the devices, you can see them in the Device Manager, as shown in the following screen.
Imported devices on Device Manager page
For more information on viewing imported devices, see
Controlling Direct Collection.
To collect metrics from the device, you need to create a polling profile and assign it to the device. For details, see
Configuring Metric Polling.
Related topics