Using the Polling wizard to create, clone, edit or delete Polling Profiles
Use the Polling wizard to manage polling profiles. A Polling Profile consists of the following elements:
• A set of performance metrics that should be polled from network devices
• The frequency at which metrics are polled, which can be set per metric
• A filter that specifies interfaces from which metrics in this profile should be collected
The Polling wizard guides you through the creation of a Polling Profile and the assignment of that Profile to one or more network devices.
To access the Polling wizard, choose Configure > Polling.
The following screen appears.
Polling pop-up
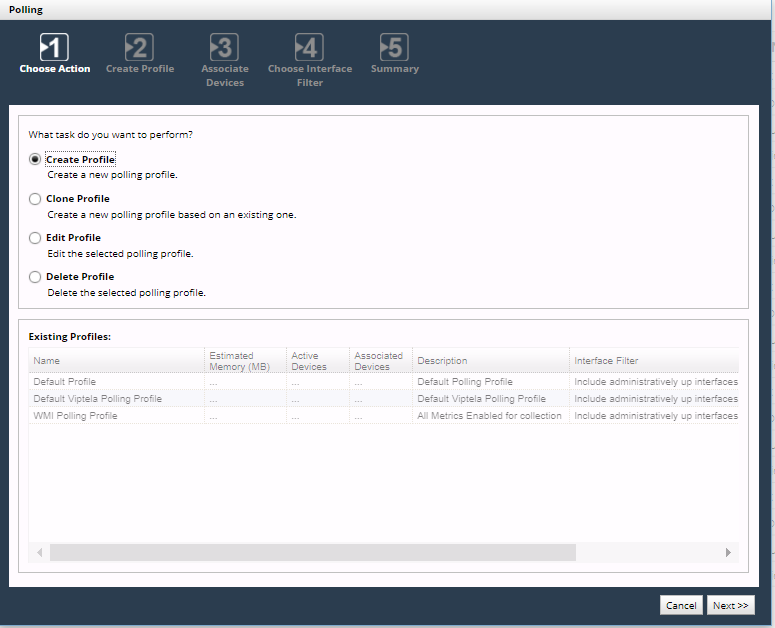
The screens you see depend on your workflow, but the wizard always starts with the Choose Action screen.
Using the Choose Action screen
1. On the Choose Action screen, select Create Profile and click Next.
The Create Profile screen appears.
2. Select Clone Profile, Edit Profile, or Delete Profile, highlight the row of the existing profile you want to clone, edit, or delete, and click Next.
The Default profile cannot be deleted. If you delete a profile that is assigned to one or more devices, the Default profile is automatically assigned to those devices in place of the deleted profile.
Using the Create Profile, Clone Profile, and Edit Profile screens
These screens allows you to create, clone, or edit a polling profile, which can then be assigned to a device to override the default polling profile created for all devices.
NetIM automatically assigns a default polling profile to every device that does not have a user-defined profile.
A device can use only one profile at a time. To see the profile that is currently assigned to a device, look at the Polling Profile column in the Device Manager.
For information about the metrics that can be included in a polling profile, see
Built-In Metrics and
Metric Classes by Vendor/Device Type.
On the Create Profile, Clone Profile, or Edit Profile screens, enter or reenter the following information for this profile:
• Profile Name (must be unique).
• Profile Description (optional).
• Node Polling Failure Tolerance—Specifies the number of consecutive polling failures that cause this device to be excluded from polling. When this threshold is reached, NetIM takes these actions:
– Stops trying to poll any metric class from the device (except the Device Status and Reachability class). When Device Status and Reachability indicates that the device is accessible again, full polling resumes.
– Counts the failure against devices dropped from polling, which in turn sends an event to the Events Dashboard.
• Metric groups and classes (metric classes to be polled and the polling frequency for each).
Expand the tree, and select metric classes to be polled and the polling frequency for each. You see different metrics for different types of devices.
If a particular metric is configured to be polled by both SNMP and WMI, it is polled by WMI only. For example, the CPU Utilization metric can be provided by both SNMP and WMI. If configured to be collected from a Windows server by both SNMP and WMI, it will be collected by WMI only. WMI-specific metrics continue to be polled by WMI, and SNMP-specific metrics continue to be polled by SNMP. To force CPU Utilization to be collected by SNMP in this case, clear the Collect WMI check box on that device in the Device Manager.
When finished, click
Next; the Associate Devices screen appears. See
Using the Associate Devices screen.
Using the Associate Devices screen
On the Associate Devices screen, set or change the set of devices to which this Polling Profile applies.
A device can be associated with only one profile at a time. If you assign this profile to a device that already has a profile, this profile replaces the other one for that device.
The names of all non-empty device Groups appear in the Devices panel on the left. To limit the set of devices that are selectable, highlight one or more Group names, or click All to be able to select from all known devices. For information about how devices become members of Groups, see
Configuring Groups.
When finished, click
Next. The Choose Interface Filter screen appears. See
Using the Choose Interface Filter screen.
Using the Choose Interface Filter screen
Choose Interface Filter screen
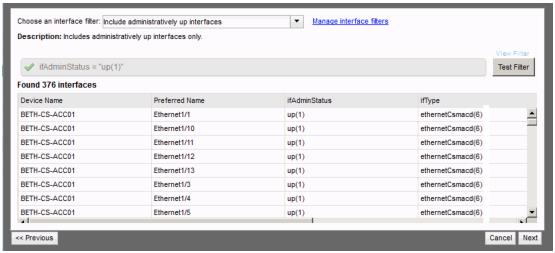
An interface filter specifies the set of interfaces to which this Polling Profile applies.
Every Polling Profile offers the following system-defined interface filters, plus the custom filters that you have already defined.
• Include All Interfaces—Includes all interfaces.
• Include administratively up interfaces—Includes administratively up interfaces only (those configured as enabled or up).
• Include administratively up and operationally up interfaces—Includes administratively up and operationally up interfaces only (those that are actually up).
• Include connected interfaces—Polls all interfaces which have a link incident to them in the NetIM model.
• Exclude all interfaces—Filters out all a device’s interfaces from being polled.
• Include connected interfaces—Includes only those interfaces that are known to be connected to another.
On the Choose Interface Filter screen, do one of the following:
• Pick any system-defined or user-defined interface filter from the drop-down list, click
Test Filter to see the set of interfaces that pass that filter, click
Next, and go to the Summary screen. See
Using the Summary screen.
The Test Filter button generates a list of the currently known interfaces that pass the filter. At runtime, the set of interfaces may be different.
Using the Manage Interface Filters screen
On the Manage Interface Filters screen, do one of the following:
• Select Create an Interface Filter and click Next.
• Select Clone an Interface Filter, Edit an Interface Filter, or Delete an Interface Filter, highlight the row of the existing filter you want to manage, and click Next.
The default Interface Filters cannot be edited or deleted.
Using the Interface Filter Details screen
An interface filter limits the action of a profile to the interfaces whose descriptive properties match a Boolean expression. The expression is evaluated from left to right by typical mathematical convention.
On the Interface Filter Details screen, you will create or edit an interface filter in either of two modes:
• Basic Filter—Allows you to assemble a logical expression by clicking property names and operators. See
Working with Basic Filters.
Using the Summary screen
The Summary screen consists of four sections:
• Poller status—A reminder of whether the poller is currently enabled.
• Profile—Settings that apply to this polling profile.
• Metric Classes to Poll—A list of the metric classes chosen on the Create Profile, Clone Profile, or Edit Profile screen
• Associated Devices—A list of the devices chosen on the Associate Devices screen.
On the Summary screen, review the configuration of this polling profile, and then do one of the following:
• Click Previous to make changes on a previous screen.
• Click Cancel to close the Polling wizard without saving the profile.
• Click Finish to save the profile and close the Polling wizard.
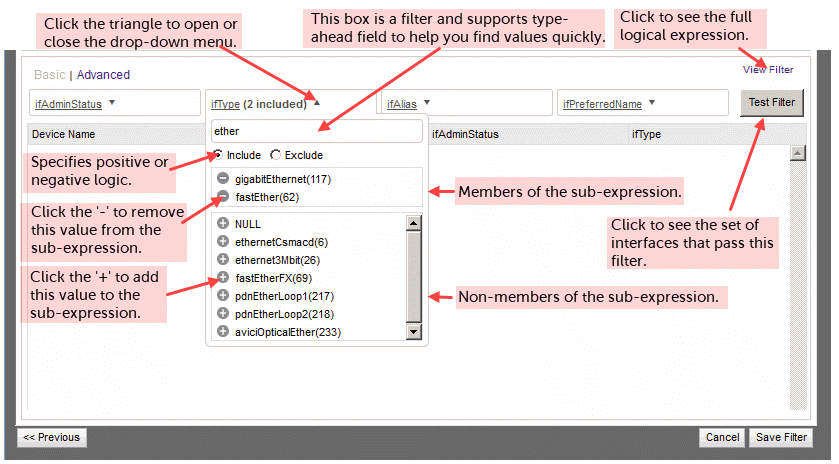
Working with Basic Filters
In a Basic Filter, you can create one sub-expression for each of the following properties of an interface.
• ifAdminStatus, which can be NULL, up(1), down(2), or testing(3).
• ifType, which can be NULL, unknown(0), other(1), plus about 250 other industry-standard interface type names.
• ifAlias, which can be EMPTY or NULL, or any string in the ifAlias property of a device.
• ifPreferredName, which can be EMPTY or NULL, or any string in the ifPreferredName property of a device.
In a Basic Filter, multiple values for one field are ORed. For example, in the ifType field, picking fastEther(62) and gigabitEthernet(117) results in ifType in("fastEther(62)", "gigabitEthernet(117)"), which is logically equivalent to (ifType = fastEther(62)) OR (ifType = fastEther(62)).
In a Basic Filter, all sub-expressions are automatically ANDed, resulting in a full expression such as: ifAdminStatus in("up(1)") AND ifType in("fastEther(62)", "gigabitEthernet(117)").
The parenthesized suffixes, like “(62)” and “(117)”, are industry-standard codes that are of interest to advanced users.
Basic Filter screen
Working with Advanced Filters
This section includes the following topics:
Rules for Advanced Filters
To create or edit an Advanced Filter, click the Filter field, and then devise a logical expression using the keywords and operators that appear in the Usage panel. To test the behavior of any logical expression, click Test Filter.
The definitions and rules for an Advanced Filter are:
• A Field is an attribute of an object in the network model. The fields that function in an Interface Filter are listed in the Usage panel. Each field type accepts different operators and allows comparisons against different value types.
• A Value is a user input. In the logical expression ‘ifType = <ethernet>’, where <ethernet> is a value.
– The rules for string values are:
Quotations are required if the value contains spaces or any other reserved characters. We recommend you wrap all values in double quotations to avoid confusion.
If the value contains a double quotation character, it must be preceded by ‘\’. For example, ifAlias ~ “foo\”bar\”” matches all interfaces whose ifAlias attribute contains “foo”bar””
In general, string fields support NULL and EMPTY value types with the EQUALS, NOT EQUALS, IN, and NOT IN operators. However, certain fields do not support these special types. This is due to the unique storage requirements for specific fields.
The rules for integer values are:
In general, integer fields support the NULL value type with the EQUALS, NOT EQUALS, IN, and NOT IN operators. However, certain fields do not support these special types. This is due to the unique storage requirements for specific fields.
If not a NULL value type, then the value must be convertible to an integer.
Integer value types must not be wrapped in quotation marks. Only the number itself is permitted.
– The rules for Boolean values are:
Boolean values can be only one of TRUE, FALSE, or NULL if applicable.
• Expressions evaluated by “=”, “!=”, “~”, “!~”, and regexp are case insensitive. Value are case sensitive. For example, ifType = foo is equivalent to iftype = foo. But ifType = foo is not equivalent to ifType = FOO.
• Keywords and Logical Operators
– A Keyword is a reserved value. The keyword NULL represents a null value. NULL can be used to find values for which the value has never been set.
– The keyword EMPTY represents an empty value. EMPTY matches empty contents in an attribute. This is a convenience keyword that can improve query readability.
– Use the AND and OR operators to connect logical expressions.
A String Operator compares the similarity of strings.
=—Tests for exact matches of string data, including the NULL and EMPTY types.
!=—Tests for inequality of string data, including the NULL and EMPTY types.
~—Performs a case-sensitive ‘contains’ check. Does not support NULL or EMPTY types.
!~—Performs a ‘negative contains’ check. Does not support NULL or EMPTY types.
in—A shorthand operator for performing an EQUALS on many values. The values within the in clause are ORed together.
not in—A shorthand operator for performing a NOT EQUALS on many values. The values within the not in clause are ANDed together.
regexp—Treats the value as a POSIX regular expression. For more information on regular expression support, see: http://www.postgresql.org/docs/9.2/static/functions-matching.html#POSIX-SYNTAX-DETAILS
not regexp—Treats the value as a POSIX regular expression. It is the inverse of the REGEXP operator.
• An Integer Operator compares the value of integers.
=—Tests for exact matches of integer data, including the NULL type.
!=—Performs negative matches against integer data, including the NULL type.
<—Performs a less than check. Does not support NULL or EMPTY types.
<=—Performs a less than or equal to check. Does not support NULL or EMPTY types.
>—Performs a greater than check. Does not support NULL or EMPTY types.
>=—Performs a greater than or equal to check. Does not support NULL or EMPTY types.
in—A shorthand operator for performing an EQUALS on many values.
not in is essentially a shorthand operator for performing a NOT EQUALS on many values.
• A Boolean Operator compares the truth of statements.
=—Tests for exact matches of Boolean data, including the NULL type.
!=—Tests for negative matches of Boolean data, including the NULL type.
• Reserved Characters
The presence of a reserved character in a value is interpreted differently depending on the operator. For example, ifAlias = ".*foo.*" filters by ifAlias values that contain the string literal ".*foo.*."
ifAlias regexp ".*foo.*" filters by ifAlias values that contain "foo" anywhere in the ifAlias value.
This is because of the regexp operator.
When any reserved character appears in a value, enclose the value with double quotation marks. The reserved characters are:
space
(—Is used for grouping and ordering within logical statements.
)—Is used for grouping and ordering within logical statements.
+—For use with the REGEXP and NOT REGEXP operators.
.—For use with the REGEXP and NOT REGEXP operators.
,—For use with the IN and NOT IN operators.
?—For use with the REGEXP and NOT REGEXP operators.
|—For use with the REGEXP and NOT REGEXP operators.
*—For use with the REGEXP and NOT REGEXP operators.
/—For use with the REGEXP and NOT REGEXP operators.
%—(for future use)
^—For use with the REGEXP and NOT REGEXP operators.
$—For use with the REGEXP and NOT REGEXP operators.
#—(for future use)
@—(for future use)
[—For use with the REGEXP and NOT REGEXP operators.
]—For use with the REGEXP and NOT REGEXP operators.
Tips for creating advanced filters
• We recommend you enclose all string values in double quotation marks. It reduces the chance for error if you subsequently change the value or operator.
• Evaluation of “contains” and regexp expressions is case-insensitive by default. For case-sensitive evaluation, use the regexp string operator. To cause case-sensitive evaluation, prefix the value with "(?c)"
• Click Test Filter to view interface results only when the network model is relatively static. If adapters that update the model are currently running, your interface filter results may change without any changes to the query itself.
Examples of advanced filters
• Search for all interfaces that have the word uplink in their ifDescr or their ifAlias fields, where the interface type is ethernet.
(ifDescr ~ uplink or ifAlias ~ uplink) and ifType = "ethernetCsmacd(6)"
• Search for all interfaces that have the word uplink in their ifDescr or their ifAlias fields (case-sensitive), where the interface type is not ethernet.
(ifDescr regexp "(?c).*uplink.*" or ifAlias regexp "(?c).*uplink.*") and ifType = "ethernetCsmacd(6)"
• Search (case-insensitive) for all interfaces whose ifAlias field starts with the word LAN.
ifAlias regexp "^LAN"
• Search (case-sensitive) for all interfaces whose ifAlias field starts with the word LAN.
ifAlias regexp "(?c)^LAN"
• Search for all interfaces whose ifDescr field contains the text test \ link.
ifDescr ~ "test \"link\""