WMI collection and metric polling
In version 2.3.0, NetIM restored Windows Metrics support to the NetIM 2.x product line. Metric classes supported in NetIM 1.x are supported in NetIM version 2.3.0 and higher. The Windows Metrics Poller supports the following metric classes:
• CPU Utilization
• Memory Usage
• Host Disk Usage
• Host Memory Usage
• Host Software Performance and Status
• Host System Statistics
• Interface Errors & Discards
– Interface Status
– Interface Utilization & Throughput
– Domain Controller
– IIS Webservice
– Microsoft Message Queuing
– SQL Server
– Windows Services
– Windows System
– SharePoint ASP.NET
– SharePoint SQL Databases
– SharePoint SQL Statistics
– SharePoint SQL Locks
– SharePoint SQL Latches
– SharePoint SQL Plan Cache
– SharePoint Search
– SharePoint Search Indexer
NetIM uses PowerShell remoting to collect Windows system model attributes and poll Windows metrics. This is different from the technology used to poll for Windows metrics and model attributes in NetIM 1.x, but the data is the same.
We estimate you should be able to poll approximately 300 Windows servers at 5-minute polling granularity with a single NetIM worker. This is an estimate and “your mileage may vary” in terms of scalability of each WMI poller service.
WMI prerequisite checklist
To ensure you are successful in Windows system attribute collection and metrics polling, use the following checklist.
These prerequisites are covered in detail in the next section.
• Remote Windows systems you are polling must support PowerShell 5.1.x or later.
• Remote Windows systems you are polling must support PowerShell remoting.
• A user must be created/added to the remote management user group for performing the Windows Metrics Collection and Polling. The user must also be in the Distributed COM Users group, Remote Management Users group, and in the Performance Monitor Users group.
If you are polling the Windows Services metric class, you must provide access to the data.
WMI prerequisites
For successful Windows Metric polling, your Windows systems must comply with the-following prerequisites:
1. Check the version of PowerShell running on the target Windows systems that you will be polling.
– Enter the PowerShell command line, as follows:
C:\WINDOWS\system32> powershell
– Check the PowerShell Version by entering the following command:
PS C:\WINDOWS\system32> $PSVersionTable
PowerShell version check
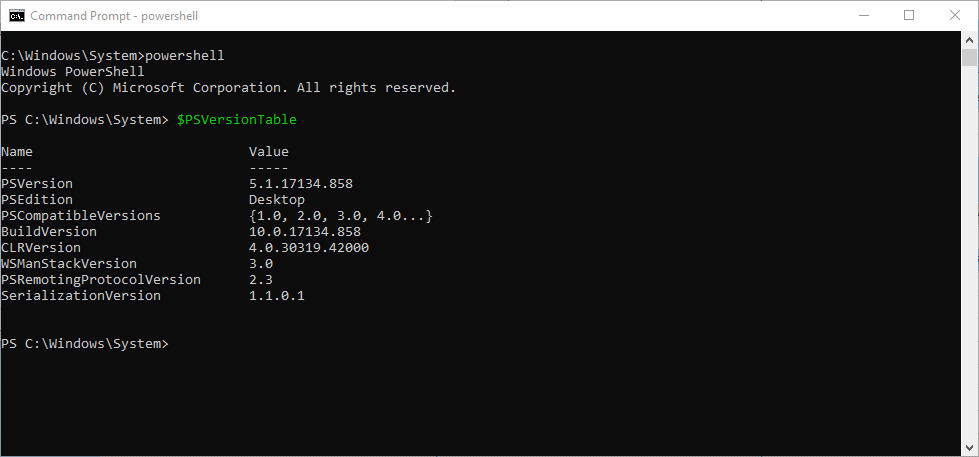
– Make sure that PowerShell version 5.1.x or greater is installed. In the unlikely event that the PowerShell version is not at least 5.1, get the appropriate installer and upgrade the PowerShell from Microsoft at
Installing Windows PowerShell. 2. Enable remoting in PowerShell, by entering the following command:
PS C:\WINDOWS\system32> Enable-PSRemoting -SkipNetworkProfileCheck -Force
3. Configure and restart the WinRM, by entering the following command:
PS C:\WINDOWS\system32> winrm quickconfig
4. Check the WinRM service settings, by entering the following command:
PS C:\WINDOWS\system32> winrm get winrm/config/service
WinRM service settings check

5. Add a user (in other words, wmiuser) to the remote management user group for performing the WMI collection and Polling, by entering the following command:
PS C:\WINDOWS\system32> Add-LocalGroupMember -Group "Remote Management Users" -Member "wmiuser"
The user needs to be in the Distributed COM Users group, Remote Management Users group and in the Performance Monitor Users group. If the Windows user is setup as domain user, then skip the next steps.
If the user is configured as a local user on the computer, them make sure to add the DWORD property LocalAccountTokenFilterPolicy in the following path and set it to 1 using regedit or using the following command in the PowerShell:
PS C:\WINDOWS\system32> New-ItemProperty -Name LocalAccountTokenFilterPolicy `-Path HKLM:\SOFTWARE\Microsoft\Windows\CurrentVersion\Policies\System ` -PropertyType DWord -Value 1
6. (Optional) If you plan to collect the Windows Services metric class (Win32_Service) you must execute a supplementary command on the remote target system to allow access to and collection of the metric class.
Run from a command prompt with administrator privilege (do not run from powershell):
sc sdset SCMANAGER D:(A;;CCLCRPRC;;;AU)(A;;CCLCRPWPRC;;;SY)(A;;KA;;;BA)S:(AU;FA;KA;;;WD)(AU;OIIOFA;GA;;;WD)
7. (Recommended) By default, some Windows systems may be configured with only 512 MB for PowerShell sessions. To avoid out-of-memory issues during collection and polling, ensure that the Windows systems are configured to have at least 1 GB of memory (2 GB recommended) for MaxMemoryPerShellMB. You can check the current settings by running this command within PowerShell:
winrm get winrm/config
To adjust the memory allocated per shell, perform the following steps within a PowerShell session:
– Set-Item WSMan:\localhost\Shell\MaxMemoryPerShellMB 2048
– Set-Item WSMan:\localhost\Plugin\Microsoft.PowerShell\Quotas\MaxMemoryPerShellMB 2048
– get-Item WSMan:\localhost\Plugin\Microsoft.PowerShell\Quotas\MaxMemoryPerShellMB
– Restart-Service winrm
– winrm get winrm/config
Resolving issues with PowerShell remoting and Windows metrics
To confirm that you can perform PowerShell remoting from NetIM core and workers to collect a class of Windows metrics, run the following commands in the PowerShell:
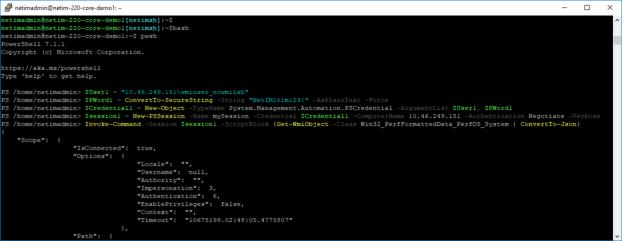
Log in to the NetIM core or a NetIM worker as netimadmin (the default password is also netimadmin) and invoke the PowerShell CLI by first entering the bash shell and then entering pwsh, as shown in the following screen:
PowerShell CLI command

Execute the following commands from NetIM core or a worker to confirm that PowerShell remoting works to a chosen target Windows system:
$User1 = "<host_ip_address>\<wmiuser>"
$PWord1 = ConvertTo-SecureString -String "<wmiuser_pwd>" -AsPlainText -Force
$Credential1 = New-Object -TypeName System.Management.Automation.PSCredential -ArgumentList $User1, $PWord1
$session1 = New-PSSession -Name mySession -Credential $Credential1 -ComputerName <host_ip_address> -Authentication Negotiate -Verbose
Invoke-Command -Session $session1 -ScriptBlock {Get-WmiObject -Class Win32_PerfFormattedData_PerfOS_System | ConvertTo-Json}
For example:
$User1 = "11.46.249.1\wmiuser_ncwmilab"
$PWord1 = ConvertTo-SecureString -String "NetIM1t1m123?" -AsPlainText -Force
$Credential1 = New-Object -TypeName System.Management.Automation.PSCredential -ArgumentList $User1, $PWord1
$session1 = New-PSSession -Name mySession -Credential $Credential1 -ComputerName 11.46.249.1 -Authentication Negotiate -Verbose
Invoke-Command -Session $session1 -ScriptBlock {Get-WmiObject -Class Win32_PerfFormattedData_PerfOS_System | ConvertTo-Json}
Invoke-Command -Session $session1 -ScriptBlock {Get-WmiObject -Class Win32_PerfFormattedData_PerfOS_System}
PowerShell confirmation
You can also use NetIM GUI-based WMITEST utility for troubleshooting. The WMITEST tool is akin to NetIM’s SNMP MIBBROWSER test tool but geared toward Windows system attributes and metrics.
To use the WMITEST tool
1. Log in to NetIM core as netimadmin/ netimadmin (default) and start xrdp, as follows:
[netimsh]:~$ start xrdp
2. RDP into the NetIM core as netimadmin/ netimadmin.
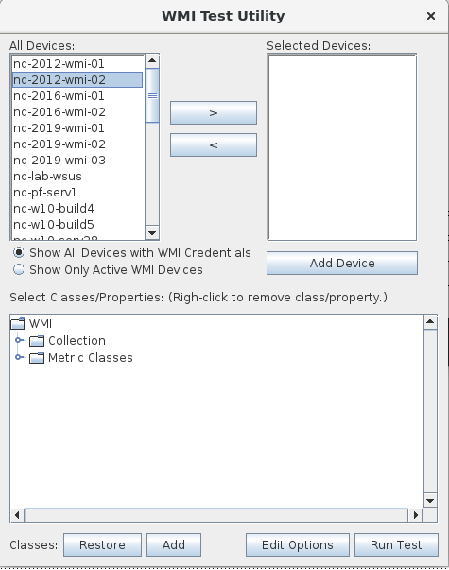
3. Launch the WMITEST tool from a terminal window, as follows:
[netimsh]:~$ app.sh WMITEST
The WMITEST utility GUI window appears, as shown in the following screen.
WMI Test Utility pop-up
4. Click Edit Options.
5. Select wmitest (Currently logged in user).
6. Click OK to save your selections.
wmitest option
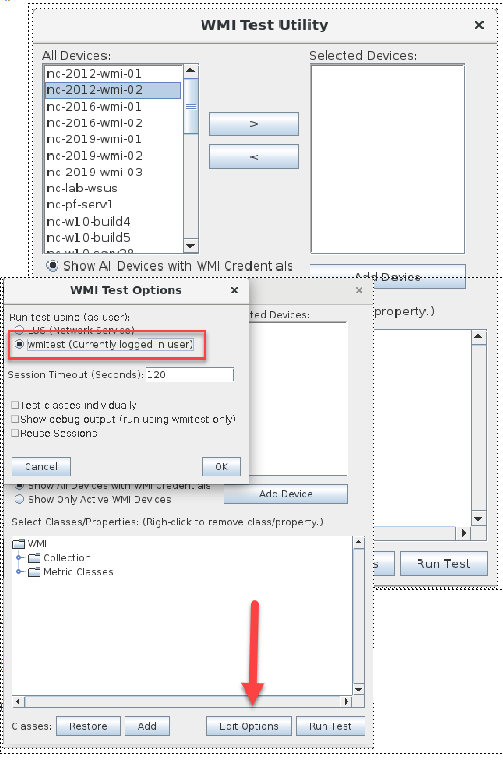
7. Select a device from the list or add a new device. The list is populated from Device Manager.
8. Click Run Test.
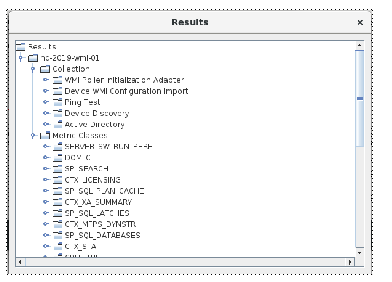
A progress Indicator appears, until the Results window displays so you can browse the results, as follows:
Results pop-up
For more information on resolving additional issues with WMI, see
Troubleshooting WMI.
Adding devices for WMI polling and attribute collection
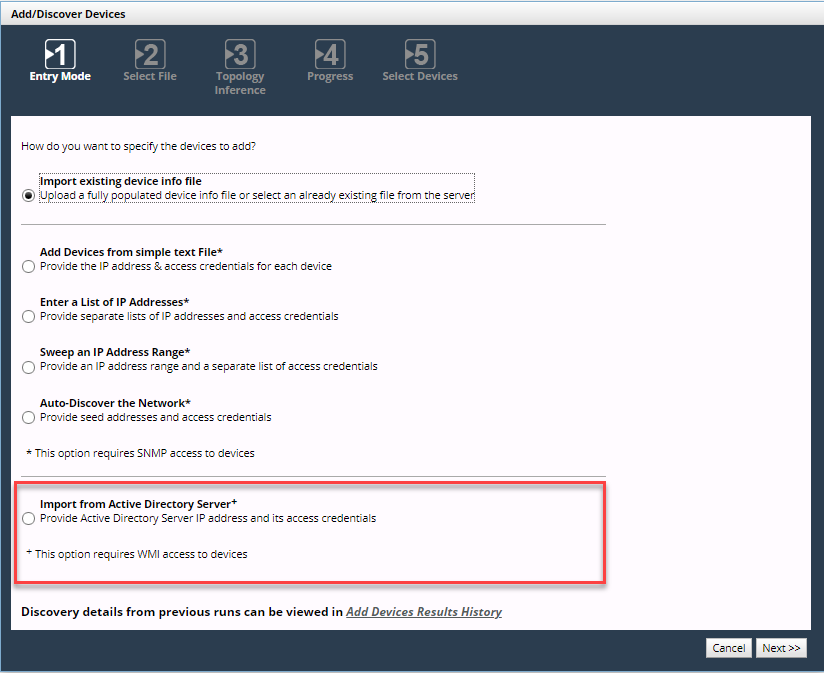
You can add Windows systems for collection and polling in many of the same ways you add devices for SNMP polling and collection and CLI (Command-Line Interface) collection. Add devices using the Configure > Add/Discover Devices wizard, as follows:
Add/Discover Devices pop-up
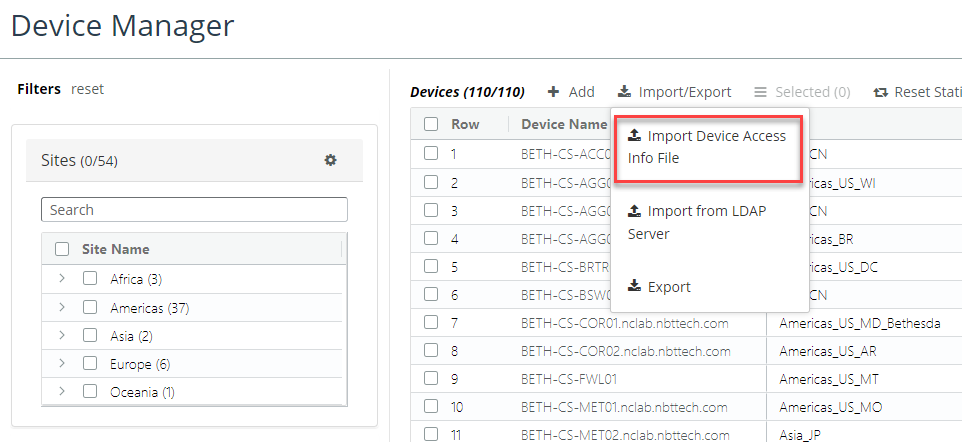
• Add device using Device Manager’s Import Device Access Info File, as follows.
Import device access info file
The Device Access Info File’s file format has a format like the following:
File format

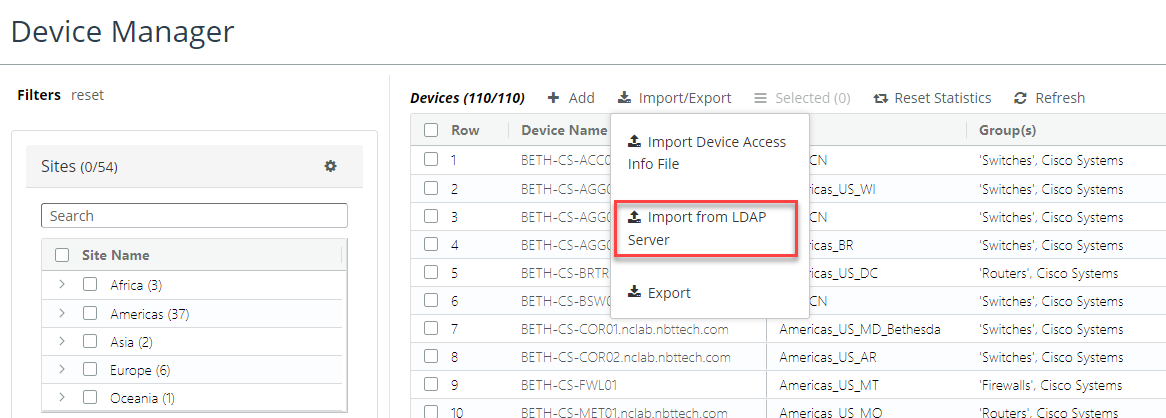
• Add devices using Device Manager’s Import from LDAP Server, as follows.
Import from LDAP server
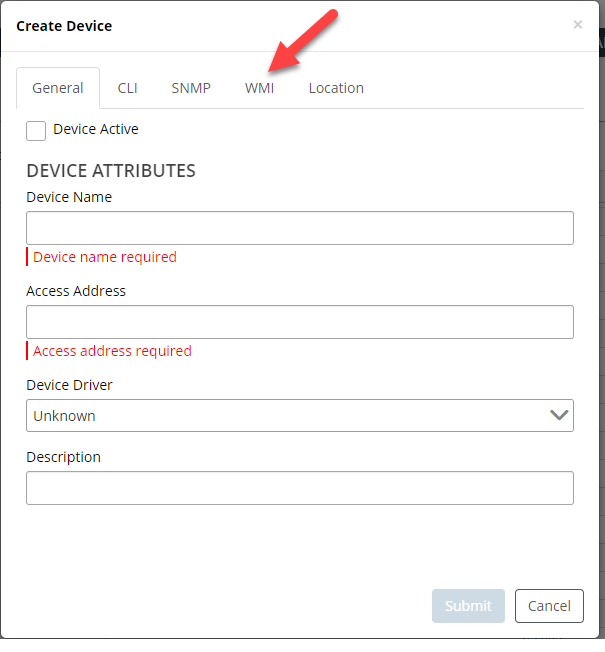
• Add an individual device using the Device Manager’s Create Device, as follows:
Create Device pop-up
Monitoring Windows model collection and metrics polling
Similar to NetIM 1.x, collection and polling can be monitored from within the Device Manager for individual device collection and within dedicated collection and polling status for summary and details.
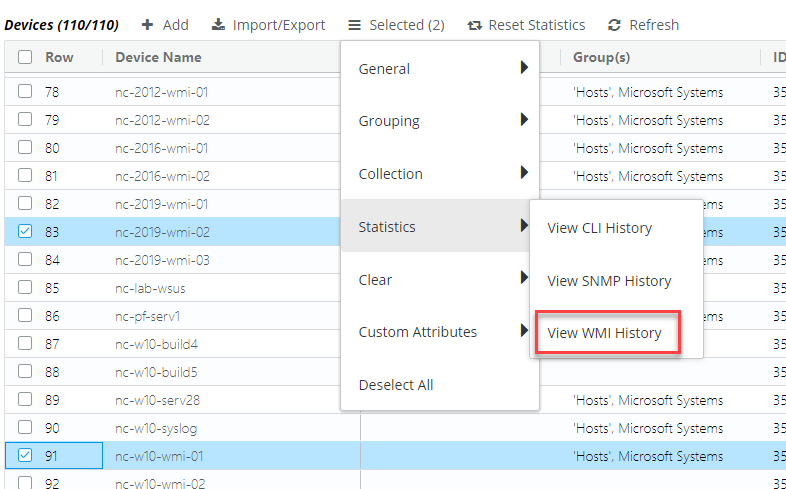
The Device Manager provides detailed collection status for each device from the Statistics > View WMI History option, as follows.
View WMI History icon
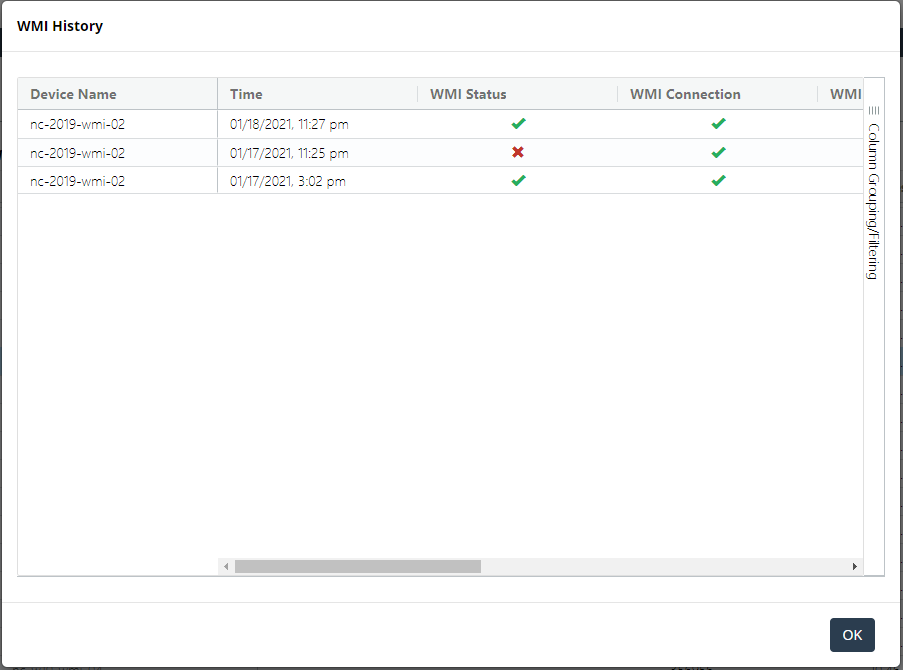
WMI History pop-up
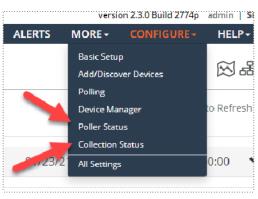
The dedicated pages for collection and polling are updated to include Windows collection and polling status. The collection and polling status pages are accessed as follows.
Poller Status and Collection Status icons