Working with Synthetic HTTP test profiles
This section covers the following topics:
Preparing for an HTTP test
To prepare for a Synthetic HTTP test, plan for the settings on the Test Configuration page in advance by performing the test manually through a browser.
Using the wizard for an HTTP Test
To create, clone, edit, or delete a Synthetic “HTTP Test” profile
1. Log in to the UI as a user with administrative privilege.
2. Choose Configure > All Settings > Monitor: Synthetic Testing.
The Synthetic Testing wizard appears.
3. On the Choose Action page, select a radio button to specify whether you will Create, Clone, Edit, or Delete a Synthetic Test Profile.
– If you are creating a Profile, click Next.
– If you are cloning or editing a Profile, highlight the name of an existing profile in the list below, and click Next.
– If you are deleting a Profile, highlight the name of an existing profile in the list below, click Next, and then typically click Finish.
4. On the Test Details page, check Active. In the Name field, enter a unique name for this Profile. In the Test Type drop-down, pick HTTP. In the Test Frequency field, set how often this test will run, or accept the default of 300 seconds. Set Timeout to the number of seconds that this test must wait for a response before giving up.
If this test is associated with the performance of one or more applications, enter the Application name(s) here. Also set the name of a Device under test, if applicable. Device can also be the name of a region, business group, or other designator. These properties are passed to downstream Riverbed products for identifying and organizing Synthetic Test results.
5. On the Test Configuration page, all settings are optional, including the Match Pattern. If you do not provide a match pattern, the test still passes as long as the status code in the HTTP response is 200 OK.
Match Pattern—A case-sensitive search string to compare text from the URL against. For instance, if a Google search page appears, you might enter Google here. The search string cannot contain wildcard characters—the test interprets characters such as asterisk (*) and percent sign (%) as literals rather than as wildcards. You can use operators <AND>, <OR>, and <NOT> in the string to form logical expressions. The following table lists some rules for using those operators:
Rule | Example: Correct | Example: Incorrect |
Operator must be all uppercase and in angle brackets (<>). Lowercase characters are interpreted as part of the search string. | <AND> | <and> |
Spaces separating elements of the search string are interpreted as part of the string. This example finds “a node” but not “anode.” | a <AND>node | |
The string can include multiple substrings connected by <AND>. | a <AND> b <AND> c | |
The string can include multiple substrings connected by <OR>. | a <OR> b <OR> c | |
Do not mix <AND> and <OR> operators in a single string. | | a <AND> b <OR> c |
The string can use <NOT> with <AND> or <OR>, but must use <NOT> as the first term in the expression. <NOT> always refers to the entire expression that follows it in the string, not just the next adjacent word or operator. In the example, <NOT> refers to A, B, and C. | <NOT> A <AND> B <AND> C | |
Do not use parentheses or brackets to nest operators. These characters are interpreted as part of the string. | | <NOT> (A <AND> B) |
6. Click Advanced.
• Set Security Protocol to TLS (Transport Layer Security) for any communication that needs to be secure (https), even redirects. We recommend you do not change this field setting to SSL.
• Under Certificate, set:
– Alias—Alias name for the client certificate that the test should use. If you have only a single client certificate in the keystore, an alias is not required.
– Password—Client certificate master private password the test should use. The master password encrypts or decrypts all keys in the keystore. You create the password associated with the certificate when you install the test engine.
• Under Headers, set:
– Basic Authentication—If access to the web server requires Basic Authentication, set the User ID and Password here.
– NTLM Authentication—If access to the web server requires NT LAN Manager (NTLM) Authentication, such as a SharePoint site does, set the Domain, Username, and Password here.
– User Agent—Request-header field. Select from the drop-down list the user agent originating the request. Usually ASnX/VNES test engine. This setting is for calculating statistics, tracing protocol violations, and generating automated responses tailored to the agent, to avoid limitations of a particular user.
– Content Type—Entity-header field. Format of the content being accessed over HTTP and sent to a recipient. For a HEAD method, the type of content that would have been sent if the request were a GET. Choose from text/plain, text/html, text/xml, application/x-www-form-unencoded, application/xml, application/json, or application/soap+xml.
– Pragma—General-header field. Add implementation-specific directives that apply to any recipient along the request/response chain. All pragma directives are optional to the protocol; however, some systems might require adherence to these directives.
– Proxy host—the hostname or IP address of a web proxy through which test engines access the network. All HTTP tests generated by this profile use the same Proxy host.
– Proxy port—the TCP port on the Proxy host at which the web proxy listens
– Proxy username—the username required to access the Proxy host.
– Proxy password—the password required to access the Proxy host.
– Other Headers—Header Name and Header Value—Custom header name and value that the request might contain. Click the plus sign to add more fields.
• Request Body—Body of the HTTP request to send. Generates a POST request, sending the data in the body of the HTTP request for the URL. Enter a string with input data to be sent to the URL, usually HTML form fields and corresponding input using name/value pairs in the following format:
<name>=<value>&<name>=<value>
Example: user=sysadmin&pass=topadmin
The data can be in any format that the server of the URL can process. When sending HTML form fields, you usually set the Content Type to application/x-www-form-unencoded.
For SOAP and XML web services, the input is raw XML and does not require the format used for HTML form fields, but does require you set the Content Type to the correct setting, such as text/xml for XML services.
7. Click Next.
8. On the Test Sources page, select one or more test engines from which this test should be run, and click Next.
9. On the Test Targets page, enter the URL or IP address of one or more devices or applications to be tested. Always include http:// or https:// in the URL. Click Next.
10. On the Summary page, verify all settings. Click Previous to go back and modify, or click Finish to save the profile.
Preparing a client certificate for an HTTP test
If communication with a secure web application requires that the client supplies a verified certificate for authentication, then you must supply the same certificate when creating Synthetic Tests for that web application. The Synthetic HTTP test has an option for using a client-side certificate establishing a secure connection with a web server.
The following procedure applies only to cases where both the server and the client have certificates to be exchanged. It does not apply to cases where the secure web server supplies a signed certificate to establish an HTTPS connection.
Importing a client certificate to a test engine for an HTTP test
A newly installed test engine has a keystore at <Install_Dir>\TestEngine\te_keystore.jks such as c:\Riverbed\TestEngine\te_keystore.jks. Use this procedure to import a certificate to it.
The keystore can hold multiple certificates. Typically, use the default keystore and do not create multiple keystores.
To import a client certificate to a test engine for an HTTP test
1. Open a command prompt on the test engine machine and navigate to the test engine installation directory such as c:\Riverbed\TestEngine
2. Verify the keystore’s integrity by running the following command:
te.bat /ks_cmd verify /ks_dir c:\Riverbed\TestEngine KEYSTORE
At every prompt, accept the default by pressing Enter.
If you have never imported a certificate to the keystore, the output is something like:
Great! You have correctly set up the keystore:C:\Riverbed\TestEngine\te_keystore.jks
. . .
Your keystore contains 0 entries
3. Import a certificate by running the following command. This command runs a script:
te.bat /ks_cmd import KEYSTORE
The prompts issued by the script are:
Key Store [c:\Riverbed\TestEngine\te_keystore.jks]:
Typically, press Enter to accept the default. Or enter an alternate path if a keystore exists there. The keystore file must always be te_keystore.jks.
Key Store Password:
Enter the keystore password you specified during installation of the test engine. This is the password that was set during test engine installation, such as changeit.
Master Key Password:
All keys must have the same password.
Make up any password upon importing the first certificate to this keystore. Use the same password upon importing subsequent certificates to this keystore. And use the same password during configuration of HTTP tests that require a certificate.
Don’t lose the password.
Path to the Certificate:
Enter the path to the certificate you are importing to the keystore, such as c:\Users\Administrator\Desktop\webmonitor06-2015.pfx
Certificate Key Password:
Enter the password that was received with the certificate from the issuing authority. After import to the test engine’s keystore, this password will no longer be needed.
4. The result of this script is an Alias, such as a52e275a414470c336fb79b26e8fd422_34ff884a-1c8b-460b-9fd6-f90fba3c2fa2890. Copy and paste it to a safe location. This Alias, plus the Master Key Password used at
step , must be entered into the “Certificate section” of the Synthetic Testing wizard. See
step 6 of
To use the wizard for HTTP test with certificate.
Using the wizard for an HTTP test with client certificate
To use the wizard for HTTP test with certificate
1. Log in as a user with administrative privilege.
2. Choose Configure > All Settings > Monitor: Synthetic Testing.
The Synthetic Testing wizard appears.
3. On the Choose Action page, select a radio button to specify whether you will Create, Clone, Edit, or Delete a Synthetic Test Profile.
– If you are creating a Profile, click Next.
– If you are cloning or editing a Profile, highlight the name of an existing profile in the list below, and click Next.
– If you are deleting a Profile, highlight the name of an existing profile in the list below, click Next, and then typically click Finish.
4. On the Test Details page, check Active. In the Name field, enter a unique name for this Profile. In the Test Type drop-down, pick HTTP. In the Test Frequency field, set how often this test will run, or accept the default of 300 seconds. Set Timeout to the number of seconds that this test must wait for a response before giving up.
If this test is associated with the performance of one or more applications, enter the Application name(s) here. Also set the name of a Device under test, if applicable. Device can also be the name of a region, business group, or other designator. These properties are passed to downstream Riverbed products for identifying and organizing Synthetic Test results.
5. Click Next.
6. On the Test Configuration page, click Advanced and enter the Alias string and the Master Key Password in the Certificate section. Click Next.
7. On the Test Sources page, select one or more test engines from which this test should be run, and click Next.
8. On the Test Targets page, enter the URL or IP address of one or more devices or applications to be tested, and then click Next.
9. On the Summary page, verify all settings. Click Previous to go back and modify, or click Finish to save the profile.
Correcting common errors from Synthetic HTTP test
Cannot recover key error
This error indicates that the certificate password in the HTTP test is incorrect, as shown in this screen.
Incorrect certificate password error
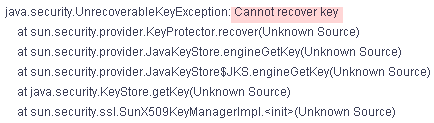
Correct this error by correcting the certificate password in the associated Synthetic Test. Then rerun the test.
If you do not remember the password, navigate on the test engine host to the installation directory (such as <TestEngineHome>\TestEngine\) and run configureTestEngine.bat /help. Follow the instructions to import_cert, verify_keystore, or empty_keystore to reimport the certificate or change the keystore password if necessary.
Keystore was tampered with or password was incorrect error
This error indicates that the keystore password is incorrect. The keystore password configured on the keystore does not match the password that the test engine has registered.
“Keystore was tampered with, or password was incorrect” error
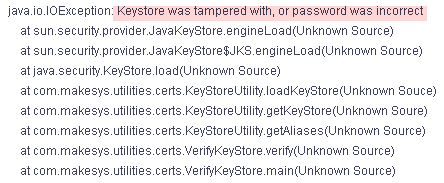
On the test engine host, navigate to the test engine installation directory (such as <TestEngineHome>\TestEngine\) and run configureTestEngine.bat
Follow the prompts to enter an old and new keystore password. When that operation is complete, the keystore and test engine keystore password will be in sync.