Preparing for a Selenium test
Examples of Selenium tests are located on NetIM core in the following directory:
<install_dir>/input/SynTestScripts
To record a web interaction in a Selenium HTML file
1. To record and replay a web interaction, you will use the Selenium IDE add-in for the Firefox browser. Search the Riverbed Knowledge Base for “NetSensor Selenium IDE” to find the version number of a compatible Selenium IDE, and then download that version from
http://docs.seleniumhq.org/ 2. Install the Selenium IDE. After it is installed, you can access the add-on from inside a browser, by choosing Tools > Selenium IDE or by clicking an icon in the icon bar.
3. When you open the Selenium IDE, it immediately begins recording actions you take in the browser.
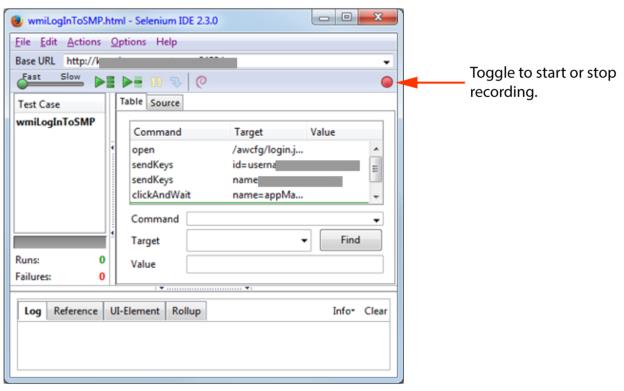
Selenium IDE for Recording Browser Actions
4. Take actions you would like to record. For instance, enter the URL to your web application’s login page and log in with a username and password.
5. To stop recording, click the red button in the upper right.
6. Use the Selenium IDE to customize or modify the code as necessary.
7. Choose File > Save Test Case and save the test case to a convenient directory in a file named <test-case-name>.html.
Do not manually modify the HTML file after this step. To tweak the code, return to
step 68. Notice that in the Table tab of the
Selenium IDE, you can see the commands for the various actions the case takes in the browser. In the example in
Figure: Selenium IDE for Recording Browser Actions, you see commands to open the browser, then keystrokes, and then a click-and-wait action. Your test should show similar actions.
9. You are now ready to use that test case in a Synthetic Test.
Preparing a client certificate for a Selenium test
Most Synthetic Selenium tests do not require a client certificate, so in most cases you will not need this section.
If communication with a secure web application requires that the client supplies a verified certificate for authentication, then you must supply the same certificate when creating Synthetic Tests for that web application. To test recorded web transactions using a Selenium test in this case, the browser that executes the test must have access to the client-side certificate.
The following procedure applies only to cases where both the server and the client have certificates to be exchanged. It does not apply to cases where the secure web server supplies a signed certificate to establish an HTTPS connection.
Selenium tests using client certificates are supported only on the Firefox web browser.
To set up client certificates for Selenium Tests
1. Go to the following directory and create a new folder such as ‘Test’:
<TestEngineHome>\testengine\active_agent\extensions\test_engine\test_engine_0\conf\selenium_tests\
2. Create a new Mozilla Firefox profile.
3. Open a command prompt on the test engine machine, navigate to the Mozilla Firefox directory (such as C:\Program Files(x86)\Mozilla Firefox\), and type firefox.exe -P at the prompt.
Mozilla Firefox profile wizard
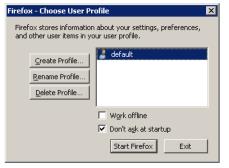
4. Click
Create Profile, and then enter a profile name that matches the folder name you created at
Step 1 (such as Test).
Profile wizard
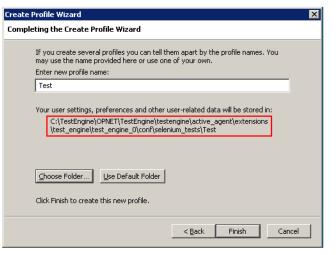
5. Click Choose Folder to select the folder, and then click Finish and Exit.
6. Import a client-side certificate into Firefox.
To import a certificate file (.p12 or .pfx), you must know the password associated with the certificate.
7. Launch Firefox, choose Tools > Options > Advanced, and then select the Certificates tab.
8. Select one automatically, and then click View Certificates.
9. Select the Your Certificates tab, and click Import.
10. Choose the certificate file. When prompted, enter the certificate password and click OK.
Using the wizard for a Selenium test
Use this procedure to create a profile for a Synthetic Selenium test with or without a security certificate.
If a security certificate is needed, see
Preparing a client certificate for a Selenium test before using the wizard here.
To create, clone, edit, or delete a Synthetic Selenium test profile
1. Log in to the UI as a user with administrative privilege.
2. Choose Configure > All Settings > Monitor: Synthetic Testing.
3. On the Choose Action page, select a radio button to specify whether you will Create, Clone, Edit, or Delete a Synthetic Test Profile.
– If you are creating a Profile, click Next.
– If you are cloning or editing a Profile, highlight the name of an existing profile in the list below, and click Next.
– If you are deleting a Profile, highlight the name of an existing profile in the list below, click Next, and then typically click Finish.
4. On the Test Details page, select Active. In the Name field, enter a unique name for this Profile. In the Test Type drop-down, pick Selenium. In the Test Frequency field, set how often this test will run, or accept the default of 300 seconds.
Set Timeout to the number of seconds that this test must wait for a response before giving up. The default timeout for each step in a Selenium Test is 30 seconds. Ensure that the Timeout you set here is sufficient for every step of the Selenium Test to take its maximum time. If this Timeout is insufficient, the Selenium Test cannot report its reason for failure.
If this test is associated with the performance of one or more applications, enter the Application name(s) here. Also set the name of a Device under test, if applicable. Device can also be the name of a region, business group, or other designator. These properties are passed to downstream Riverbed products for identifying and organizing Synthetic Test results.
5. Click Next.
6. On the Test Configuration page, click Upload, browse and select the test HTML file, and click Open.
In the drop-down menu, select the test type: Web Driver (default), RC using Mozilla Firefox, RC using Google Chrome, or RC using Internet Explorer. (If this “Selenium Test” requires custom browser settings, such as a permanent acceptance of an unsigned server-side certificate, or a client-side certificate, and then you’ll need Mozilla Firefox with a named profile). The chosen browser must exist on the host of every test source (test engine) where this test is or will be deployed. A “Selenium Test” can be played back on: Firefox Version 21.
7. Click Next.
8. On the Test Sources page, select one or more test engines from which this test should be run, and click Next.
9. On the Test Targets page, enter the URL or IP address of one or more devices or applications to be tested, Include “http://” in the URLs. Click Next.
10. On the Summary page, verify all settings. Click Previous to go back and modify, or click Finish to save the profile.
Watching a Synthetic Selenium test in action
All Synthetic Selenium tests run on the Riverbed test engine service in the Local System user account of the test engine host. Every time a Selenium test runs (whether scheduled or on demand), the Interactive Services Detection pop-up appears. This pop-up notifies the logged-in user that the local system user’s desktop can be opened for viewing.
Interactive Services Detection pop-up
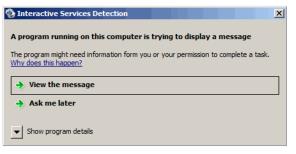
To view the interaction of a Synthetic Selenium test on the test engine in real time, click View the message on the Interactive Services Detection pop-up. A Selenium test is the only Synthetic Test type that “plays” its interaction on the local system user’s desktop.
The test engine’s host is usually unattended, and it is safe to leave this pop-up open indefinitely.