Configuring alert notifications
Use the Notification wizard to configure how notifications are sent for an alert. If a notification server is not configured and set to be active, no notifications of the corresponding type will be sent; however, alerts will still appear in the Alerts Manager.
Notifications can be delivered to:
• a syslog server
• one or more individuals using e-mail
• network management software using an SNMP trap
• Slack
• xMatters
• Splunk
• ServiceNow
To enable/disable notifications triggered by a specific alert profile, use the Alerts Profile page (choose Configure > All Settings > Alert: Alert Profiles), and then select that alert and modify the notifications as necessary.
To configure notification settings
1. Log in as a user with administrative privilege.
2. Choose Configure > All Settings > Alert: Notifications.
The Notifications wizard appears, as follows.

Notifications wizard
Wizard Step 1 - Select Settings:
Select the notification settings that you want to configure. Choose one or more of the following types and click Next.
– SNMP Traps
– Syslog
– Email
– Slack
– xMatters
– Splunk
Splunk’s HEC uses a token-based authentication model. A token has a unique value, which is a 128-bit number that is represented as a 32-character globally unique identifier (GUID). You generate the token on Splunk and provide the token in NetIM’s Notifications wizard along with several other parameters. (No Splunk credentials are required to be configured within NetIM.)
If Splunk server’s certificate is self-signed or from a CA that is not in Java’s set of trusted CAs, you must download and import the Splunk server’s certificate into the NetIM Manager’s truststore.
– ServiceNow
Basic Authentication (Basic Auth) and Open Authentication (OAuth) are supported for authenticating with the ServiceNow platform. You should coordinate with your ServiceNow administrator to obtain the required Client ID and Client Secret for configuring ServiceNow for OAuth.
The following steps assume that all types are selected. If a type is not selected, the corresponding step is skipped.
Wizard Step 2 - SNMP Traps:
(This step appears if SNMP Traps is selected)
3. Select one of the following options:

—Adds an SNMP Trap Destination Configuration

—Edits the SNMP Trap Destination Configuration

—Deletes the SNMP Trap Destination Configuration
4. Each SNMP trap destination configuration is defined with the following fields:
Basic Settings:
– Active—SNMP trap is active
– Display Name—Name of the SNMP trap
– Address—IP address or hostname
– Port
– Version (v1, v2c, v3)
SNMP Credentials:
– Community String (v1 / v2c)
– Security Level (v3)
– Username (v3)
– Context Name (v3)
– Auth Protocol (v3)
– Auth Password (v3)
– Priv Protocol (v3)
– Priv Password (v3)
5. Optionally, click Send Test Trap to test the defined SNMP trap destination configuration.
6. Click Add to add a new operation, or click Apply to complete the edit operation.
SNMP traps are not saved until you click Finish on the Summary screen.
7. After defining SNMP traps, click Next.
Wizard Step 4 - Syslog:
(This step appears if Syslog is selected.)
8. The Syslog notification is defined with the following fields:
– Active—Notification is active
– Protocol—UDP or TCP
– Server
– Port
9. Optionally, click Send Test Syslog Message to test the defined notification.
10. Click Next.
Wizard Step 5 - E-mail:
(This step appears if E-mail is selected)
11. The E-mail notification is defined with the following fields:
– Active—Notification is active
– Server
– Port
– Sender
– SMTP User—Account for sending alert e-mails; for SMTP servers that require authentication
– SMTP Password
12. Optionally, click Send Test E-mail to test the defined notification.
13. Click Next.
Wizard Step 6 - Slack:
(This step appears if Slack is selected.)
14. The Slack connection is defined with the following fields:
– Active—Notification is active
– Webhook address—The URL that contains the webhook endpoint to which you need to post a REST request.
For instructions on creating Slack webhooks, log in to your Slack account and search for “Incoming Webhooks” or “Send data into Slack in real-time” or “Add Incoming Webhooks Integration.”
15. Optionally, click Send Test Message to test the defined notification.
16. Click Next.
Wizard Step 7- xMatters:
(This step appears if xMatters is selected.)
17. The xMatters connection is defined with the following fields:
– Active—Notification is active
– Webhook address—The URL that contains the webhook endpoint to which you need to post a REST request.
18. Optionally, click Send Test xMatters Message to test the defined notification.
19. Click Next.
Wizard Step 8- Splunk:
(This step appears if Splunk is selected)
20. The Splunk notification is defined with the following fields:
– Active—Notification is active.
– Protocol—HTTP or HTTPS.
– Server—The IP or FQDN of the Splunk instance.
– Port—Splunk HEC port number (8088 by default).
– Private Token —A 32-character globally unique identifier (GUID) key that you must generate on Splunk and supply to NetIM in order to successfully send the notification. For example: B5A79AAD-D822-46CC-80D1-819F80D7BFB
– Index—The name of the Splunk tag ("index") that should be used to store the notifications from NetIM.
Remember to import the SSL certificate on the swarm manager.
– End Point—The Splunk HEC endpoint you want to use: for example, /services/collector/event.
NetIM sends notifications to Splunk in JSON-format only
21. Optionally, click Send Test Splunk Message to test the defined notification.
Splunk will appear as a destination for alerts in the Alert Profiles page. Default Splunk Notification Templates are provided in the Notification Templates page and can be cloned and edited like other notification templates.
22. Click Next.
Wizard Step 9- ServiceNow:
(This step appears if ServiceNow is selected)
23. The ServiceNow notification is defined with the following fields:
– Active—Notification is active.
– Protocol—HTTP or HTTPS.
– Server—The IP or FQDN of the ServiceNow instance.
– Authentication method—Basic or OAuth.
– Client ID—The OAuth client ID for NetIM on the ServiceNow instance.
– Client Secret—The OAuth client secret for NetIM on the ServiceNow instance.
24. Click Next.
Continue configuring the ServiceNow notification with the following fields:
– Username—The username for the ServiceNow instance.
– Password—The password for the ServiceNow instance.
– End Point—The ServiceNow endpoint to use.
25. Optionally, click Send Test ServiceNow Message to test the defined notification.
26. Click Next.
Wizard Step 10- Summary:
27. Review the notification settings.
28. To make changes, click Previous.
29. To save, click Finish.
After notifications are defined, you can define Alert Profiles that use the configured notification methods. For more information, see
Configuring an alert profile.
Certificate requirement for Splunk HEC integration—certificate validation
NetIM enables certificate validation by default. As such, your NetIM integration with Splunk may require an additional step if your Splunk server’s certificate is self-signed or from a CA that is not in Java’s set of trusted CAs, in which case, you must download and import the Splunk server’s certificate into the NetIM Manager’s truststore.
The following instructions explain how to download and import the Splunk server’s server certificate into the NetIM Manager’s truststore. Convenience scripts and files are located on the Manager.
1. Log in to the NetIM server.
2. To generate the certificate, enter the following command: generate_cert.sh <server-address>:<port>
Connects to the server address and port provided and downloads the certificate in the PEM format and names the file mycertfile.pem.
3. To import the certificate, enter the following command: import_cert.sh <certificate-file-name> <alias name>
Imports the given certificate into the truststore with the given truststore password.
– truststore-password.txt
Contains the password to be used to manage the truststore. By default, the password is changeit.
– truststore-type.txt
Contains the type of the truststore; by default it is JKS format, which is Java key store.
– truststore
A binary file that, by default, contains the default root certificates available with Java installs.
4. To download and import a certificate into the Manager’s truststore, do the following:
– Within netimsh shell, stop all the core and Manager services by running stop all on both the core and manager.
– Enter the bash shell on the Manager by typing bash.
– Change your working directory to the truststore directory by typing cd ~/common/tenant-stack/1/truststore/.
– Run the generate_cert.sh script. The script connects to the server at the given port and downloads the certificate in the PEM format. The certificate is stored as mycertfile.pem in the same folder.
Usage: sudo ./generate_cert.sh <server-address>:<port>
For example, sudo ./generate_cert.sh amazon.com:443
– Import the certificate into your truststore by using the import_cert.sh script. The certificate is automatically imported into the truststore.
Usage: sudo import_cert.sh <certificate-file-name> <alias-name>
For example, sudo ./import_cert.sh mycertfile.pem myaliasname
– In the netimsh, start the NetIM services using start all on Manager. After all required swarm services have started, use start all on core to start all core services.
Testing Splunk HEC integration
After configuring the Splunk HEC integration, you can test the integration. For more information, see
Configuring alert notifications.
You will be presented with a dialog indicating whether the test was successful or not. The test message diagnostic dialog text is usually sufficient to identify any issues if the test was not successful. Confirm with your Splunk administrator that the test notification was received and is the expected format and content. For further troubleshooting you can download and view logs from NetIM’s Service Status page. The ability to download and view logs related to all notification sending are located under the Swarm Services, Notification Sender section of the System Status page.
ServiceNow integration
The Advanced Options configurations within the wizard is only require in special cases and can be ignored. When configuring the ServiceNow integration for OAuth you will be asked to provide login credentials to ServiceNow.
ServiceNow login for notifications
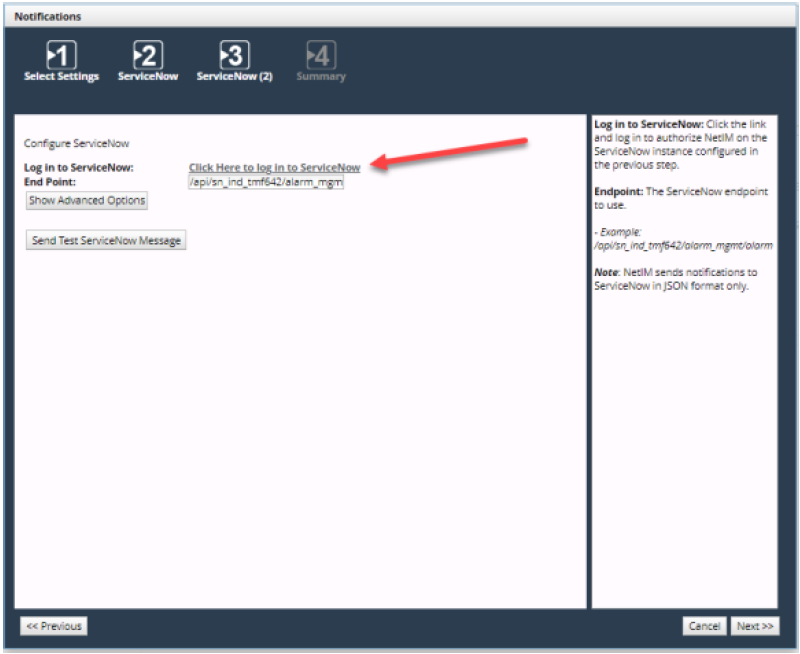
This step is required to obtain the OAuth Refresh Token. Once you successfully log in to ServiceNow, a browser page will launch. Close the browser window and return to the Wizard to continue the ServiceNow setup. At this point you have obtained the OAuth Refresh Token and it has been automatically added to the configuration settings. You can test the ServiceNow integration with the test button. Check your ServiceNow application to ensure the test message reached ServiceNow.
ServiceNow integration with Basic Authentication requires that you provide a username and password.
The username and password you provide in this step will be encrypted and stored on the NetIM server. The API endpoint is the default endpoint used for the NetIM ServiceNow integration. Do not change the API endpoint unless instructed to do so by Riverbed Support and your ServiceNow administrator.